Books
Welcome to the documentation for books!
Book Scene
All book scenes have the same structure. The book is divided into two peices, Canvas and Book. Both these pieces are game objects in unity at the root level of the scene.
- The only other things at the root level are the main camera, the event system, and the navbar canvas prefab. You probably won't need to change these.
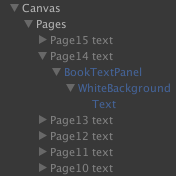
Canvas, i.e. where the text goes
The 'Canvas' game object holds the 'Pages' game object, and the 'Pages' game object holds the text for every page.
Note
The page text game objects go in decending order.
Book, i.e. where everything else goes
The 'Book' game object holds game objects for every page, named PageN (e.g. Page1, Page16). Each of these has a 'Page' script and Sorting Group on it.
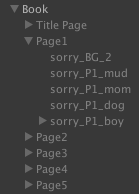
These game objects hold the majority of what is on every page. The background image and any objects or characters on the page are children of the PageN object. Each PageN object will have a playable director component attached that is responsible for playing animations and audio on the page. The playable director references a Timeline asset that defines the sequence of audio and animations. These timeline assets should follow the naming convention 'BookNamePageNTimeline'.
Note
The page game objects go in ascending order.
Note
PageN has a sorting order of 100-N, i.e. Page1 has a sorting order of 99, Page2 has a sorting order of 98, and so on. If you add pages to the book, ensure their sorting order is correct.
Note
When you start a new book, you can duplicate the BlankBookTemplate scene for convience. If you are a glutton for punishment, you can make a scene from scratch. Please do not copy an existing book to make a new book, you'll probably break that book if you aren't careful.
Keyboard Shortcuts
In Edit mode:
- To move from the page you are on to the next page, use Shift + Command + period
- To move from the page you are on to the previous page, use Shift + Command + comma
In Play Mode:
- To kill a timeline, use Command + Shift + k
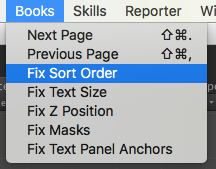
Helper Methods (under Books in the top bar)
Fix Sort Order
In the process of making your book, things can get out of order. Adding a page, moving pages around, or accidentally changing a number will make the sort order of the pages all out of whack. This button fixes that.
Fix Text Size
When you are entering the text for each page or when you inevitably have to go back and change the text, you might find that the text's size on one or more of the pages is off. Clicking this button fixes that, on all the pages!
Fix Z Position
When you start placing things (backgrounds, objects, characters, scenery) or moving them around on a page, things can get a little off in the Z position. This button makes everything on every page all on the same Z position, and with only one click.
Fix Masks
This ensures that all pages have a properly sized mask on them.
Fix Text Panel Anchors
Sometimes, the anchors on the text panels can get weird. Maybe you accidentally moved one, maybe someone else did, but clicking this will make it like it never happened.
Book Menu
Making A New Book
When you set out to make a new book, the first thing you should do is duplicate the BlankBookTemplate scene in Unity. This has everything you'll need to make your own book. Rename the scene and you're ready to go!
Folder Structure Setup
You'll want to start by taking all the book's assets (audio lines, SFX, backgrounds, characters, objects, animations, etc.) and placing them in the folder structure.
- Assets
- Alegra
- SceneSpecific
- Books
- Your Book Folder (e.g. ThisIsntARealBook or HiFriends).
- Books
- SceneSpecific
- Alegra
At the root level of your book folder, you'll want to start with four folders named Animations, Audio, Images and Timelines. Your scene goes at the root level, and everything else should fit into these four folders. Within the Animations folder, you should have all your animations and their meta files. Your Timelines folder should hold all timelines and their meta files. All audio files and any related metas go in the Audio folder. In the Images folder, you should have a folder for Backgrounds, Misc, and one for each major character.
- Your Book Folder
- Animations Folder
- Your Animations
- Audio Folder
- Your Audio
- Images Folder
- Backgrounds Folder
- Your Backgrounds
- Character1 Folder
- Spritesheet
- Rig
- Character2 Folder
- SpriteSheet
- Rig
- Misc
- Other Images
- Backgrounds Folder
- Timelines Folder
- Your Timelines
- YourScene
- Animations Folder
Adding or Deleting pages
Hopefully, the blank book scene will have more pages than you'll need, so you'll only need to delete the extras. If so, remember to delete the page and the text.
There are a few things that pop up when you create a new page in a book. To avoid strange problems later on, go through this list and make sure you do all the things in it
- Name the page properly
- Make sure there is a corresponding text holder (under Canvas)
- Name the text holder properly
- Click on the new page object. Drag the matching text object from under the canvas into the Page script 'text' field
- Fix the sorting order
- Create and name properly a new timeline for this new page
Book Dimsums
Clickable Book Image
The Clickable Book Image DimSum is a DimSum you put onto a SpriteRenderer. This makes the SpriteRenderer a clickable object. It will highlight and play audio when it is clicked. By default, the audio to play is set to the objects name. However, by typing the name of any audio file into the 'Audio Name' field, you can overwrite that and have it play any audio when clicked. (Orange arrow). If you need two or more audio files to play on click, you can use the OnClickTimeline field. First, make a timeline with the needed audio files in it. Then drag that timeline into the DimSum's OnClickTimeline field. (Blue arrow)

This DimDum is designed to work with an image that you want highlighted around the edges. If there is something you want highlighted on, for example, a background (not it's own image) you'll need to use the Custom Region DimSum.

When you use the Custom Region script, click on the image you want to make a custom region on, then use the GameObject menu at the top of the screen. Custom Region should be an option near the bottom, with the option of using the keyboard shortcut Option + r. With the custom region script, you create a custom clickable region by clicking on the image to create an outline. This is the link to the Custom Region documentation.
Book Click Sort
This DimSum works only with custom regions. If you have two or more custom regions on the same Z position, it leads to odd click effects. This dim sum fixes that!
Timelines
Timelines are what we use to determine when audio files should play, when images on the screen are activated/deactivated, and when to play animations. The most important of this list for books is the audio - the way we make the audio files play when you turn the page is with a timeline. Every page needs a timeline attached to it. The blank book template doesn't have timelines on it by default (this is on purpose).
- To add a timeline, click on the page object in Unity.
- Open the timelines tab by following the directions here
- In the 'Timelines' tab (pink circle on second image) click 'Create'

Name the timeline properly and save it in the 'Timelines' folder under 'Animations'. Then you'll be able to add an audio track, then an audio clip to the audio track. Please see this page for more information about timelines. The convention is to have everything on the timeline start at 15 (yellow arrow shows an audio clip starting at 15), the only exception being activation tracks, which should start at 0 (purple arrow shows an activation track starting at 0).
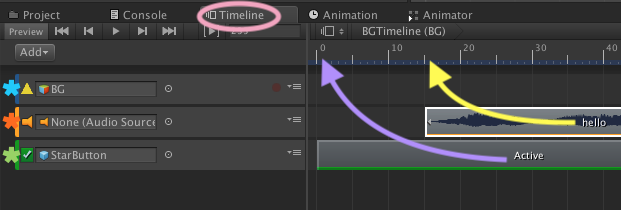
The timeline comes with an animation track (blue asterisk). Right clicking on the timeline (where the arrows are) will allow you to add an animation clip. If you don't have an animation on the page, feel free to delete the animation track after you add the audio track, it's unnecessary. The audio track (orange asterisk) is added by right clicking below the animation and clicking "Audio Track". Adding an audio clip is as easy as right clicking on the right side of the track and selecting 'Add From Audio Clip'. The activation track (green asterisk) is added the same way.
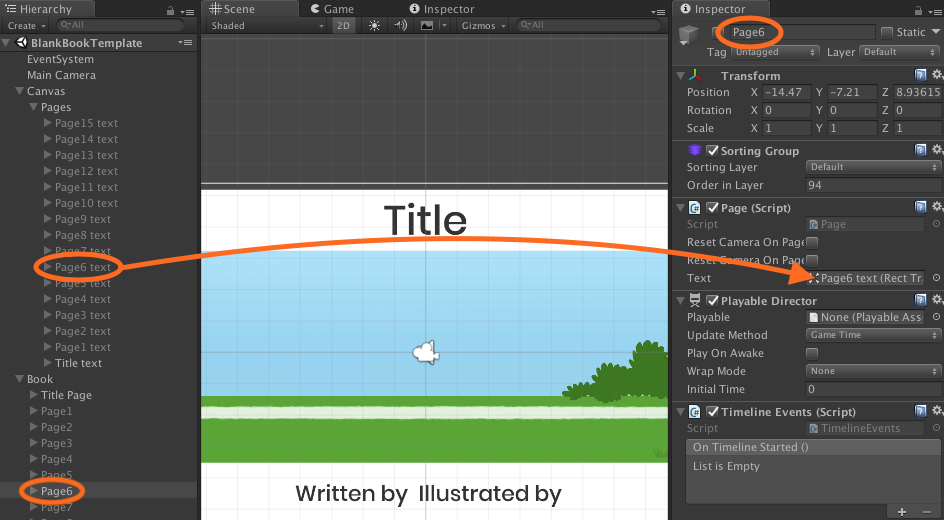
Pages and Page Text
Pages and page text go together like the two halves of a sandwich. You have to put them together. Each page's text is held in a game object under Canvas in the hierarchy, and the rest of the information about the page is in a page object under Book in the hierarchy. To connect them, you need to follow the steps outlined in Adding or Deleting pages. This ensures the text turns with the page.
Naming
The name of your scene should begin with 'Book' and be followed by the name of your book with no punctuation or spaces, using title case.
- Example: 'BookThisIsntARealBook' or 'BookHiFriends'
The name of your page-text-holding-objects should be PageNText
- Example: 'Page1Text', 'Page18Text'
- Exception: 'TitleText'
The name of each page should be PageN
- Example: 'Page1', 'Page10'
- Exception: 'TitlePage'
The name of a timeline should be BookNamePageNumberTimeline
- Example: 'ThisIsntARealBookPage8Timeline', 'HiFriendsTitlePageTimeline'